Pick up the mask on the right edge of the scene. Select the balcony railing.  Your goal is to grab the key from the machine using only the buttons at the bottom of the machine. Click on the mechanism for a closer view. Drop the carpet beater onto the jester. Drop the prince onto the cart. Speak with the man seated at the desk. Remove the beetle in her chest with the tweezers. Grab the club. Place the figures as they appear in our solution image.
Select the fire alarm on the left column. Take the SPRING. Select the broken egg man. Take the shield.
The purple arrows control the ring they are attached to. MIDDLE ALL THE BACK
Drop the wheat onto the mill. 7-5
Make sure you get the PINS. Use the knife to cut the screw from the badge. Click on the sparkly bar on the right for a closer view. Go up the stairway and Simon will tell you that you need to go back and look for Felicia. -Some hidden objects are randomized in the hidden object puzzles.  Make sure you take the HOSE. Select the honey. Click on the right drawer for a closer view. The stick is on the left side of the fountain. Select the tricycle. Use the purple arrows to move the runes around. Click on the skull on the lower left for a closer view. You have activated a new puzzle! Travel to the left side of the stage. Use the red buttons to move the crab legs. Simon is freed from the contraption and escapes. Select the horn to the right of the gate. Inside the gun is the BULLET. Drop the jump rope on the motor. Your goal in this puzzle is to move the large square piece into the upper right corner. Drop the telescope on the tripod. Select the puppet. The final paths of this haunting mystery have finally arrived. Select the four fish to find the SUN. Once everything has been done correctly, the grating will open, go through it. Travel through the back door. This time he runs into the Corridor. Pick up the Blue Lever on the 4th chair from the left, in the front row. The white buttons will move the water sprayers. PuppetShow Return to Joyville Screw Puzzle Solution. Grab the balloons. 5-4
Each time you click on the gold token correctly a colored token will appear. If you click on the fountain you can search for a list of objects. Underneath you will find a panel that is sealed shut. Complete the hidden object puzzle. Take the doll. When the cursor turns into a magnifying glass it means you can zoom in to an area in the scene. Travel through the door on the left. Take the cane and elastic band. Go back upstairs by placing your cursor at the bottom of the scene 2 times. Click inside the gate once the statue stops playing the violin and you will automatically enter a Hidden Object scene. Take the ARROW. Complete the hidden object puzzle. Push the partition aside. Simply press the key marked A twice. Drop the pins onto the lock to begin a new puzzle! The writing beneath the keys will give you important hints! A sparkly spot will appear on the ground once the boiler starts working. When you reach outside you will notice that the sun is setting. Click on the lever in the lower right side of the generator to start it. They can be items like a piece of cloth that needs to be removed or a cabinet that needs to be opened. Pick up the Puppets Arm in the lower left side of the fireplace. Select the gear hanging from the chain. You can sometimes find inventory items in these areas. Now move all the white balls to the left side of the tube. -The hand icon allows you to take items that can be added to your inventory. Take the razor. Select the jester. If you click on the bookcase it tells you there is a strange slotted lock that doesnt take a regular key. Grab the Diamond Ring from the tools section, place it the glass encircling the key and the ring will cut the glass. Drop the puzzle core into the center portion of the door to begin a puzzle! Click on the arrows and the numbers in that bar will swap places. We recommend ourHaunted Halls: Fears from Childhood Walkthrough. Click on the floor drain for a closer view. Select the desk. Open the purse to find the POSTCARD. Select the chest to begin a new puzzle! Drop the chain onto the door. Travel up the stairs after the beanstalk appears. Click on the large puppet to the right of the door for a closer view. Remove the cover to find the dowel. All scenes will have an area in which a single sparkle appears or several sparkles appear. Select the bushes. Make sure you take the BAND! When you first enter the Corridor it is very dark. Select the shield. Select the tennis shoe to find the GUM. Select the postings on the right. 5-4-3
The hand icon allows you to pick up inventory items or explore certain areas. Enjoy the bear! Move the one black ball in the holding spot all the way to the right. Click on the machine on the left for a closer view. Your goal is to move all the black balls to the right and all the white balls to the left. Select the door on the right. Exit out of the Fountain by placing your cursor downwards. The object is to adjust the gears in a certain order to show the wires. Make sure you get the SNAIL! Notice the numbers 8, 35, and 62. Place the crowbar on top of the steps so you can remove the block. You will not know which item goes into inventory until all the items have been cleared from the list. Remove the wallpaper on the left side of the room. Select the wheel on the boiler to the left. Place the Lever from inventory in the empty slot. Travel through the red curtain. The game opens on a likely street with a strange, curvy road and lopsided buildings. Drop the glue bottle on the broken plate. Take the BROOM. If you look at the diagram again it shows you a large, medium and small weight next to the letter L. Drop the helmet on his head. Make sure you grab the PENGUIN! Select the back door. Go back to the Hall by placing your cursor on the left door. PuppetShow Return to Joyville Walkthrough, Haunted Halls: Fears from Childhood Walkthrough, Discover Exciting New Elements in Spellarium 2, Available Now! Pull the lever. Remove the doll with the razor. Select the valve twice.
Make sure you take the HOSE. Select the honey. Click on the right drawer for a closer view. The stick is on the left side of the fountain. Select the tricycle. Use the purple arrows to move the runes around. Click on the skull on the lower left for a closer view. You have activated a new puzzle! Travel to the left side of the stage. Use the red buttons to move the crab legs. Simon is freed from the contraption and escapes. Select the horn to the right of the gate. Inside the gun is the BULLET. Drop the jump rope on the motor. Your goal in this puzzle is to move the large square piece into the upper right corner. Drop the telescope on the tripod. Select the puppet. The final paths of this haunting mystery have finally arrived. Select the four fish to find the SUN. Once everything has been done correctly, the grating will open, go through it. Travel through the back door. This time he runs into the Corridor. Pick up the Blue Lever on the 4th chair from the left, in the front row. The white buttons will move the water sprayers. PuppetShow Return to Joyville Screw Puzzle Solution. Grab the balloons. 5-4
Each time you click on the gold token correctly a colored token will appear. If you click on the fountain you can search for a list of objects. Underneath you will find a panel that is sealed shut. Complete the hidden object puzzle. Take the doll. When the cursor turns into a magnifying glass it means you can zoom in to an area in the scene. Travel through the door on the left. Take the cane and elastic band. Go back upstairs by placing your cursor at the bottom of the scene 2 times. Click inside the gate once the statue stops playing the violin and you will automatically enter a Hidden Object scene. Take the ARROW. Complete the hidden object puzzle. Push the partition aside. Simply press the key marked A twice. Drop the pins onto the lock to begin a new puzzle! The writing beneath the keys will give you important hints! A sparkly spot will appear on the ground once the boiler starts working. When you reach outside you will notice that the sun is setting. Click on the lever in the lower right side of the generator to start it. They can be items like a piece of cloth that needs to be removed or a cabinet that needs to be opened. Pick up the Puppets Arm in the lower left side of the fireplace. Select the gear hanging from the chain. You can sometimes find inventory items in these areas. Now move all the white balls to the left side of the tube. -The hand icon allows you to take items that can be added to your inventory. Take the razor. Select the jester. If you click on the bookcase it tells you there is a strange slotted lock that doesnt take a regular key. Grab the Diamond Ring from the tools section, place it the glass encircling the key and the ring will cut the glass. Drop the puzzle core into the center portion of the door to begin a puzzle! Click on the arrows and the numbers in that bar will swap places. We recommend ourHaunted Halls: Fears from Childhood Walkthrough. Click on the floor drain for a closer view. Select the desk. Open the purse to find the POSTCARD. Select the chest to begin a new puzzle! Drop the chain onto the door. Travel up the stairs after the beanstalk appears. Click on the large puppet to the right of the door for a closer view. Remove the cover to find the dowel. All scenes will have an area in which a single sparkle appears or several sparkles appear. Select the bushes. Make sure you take the BAND! When you first enter the Corridor it is very dark. Select the shield. Select the tennis shoe to find the GUM. Select the postings on the right. 5-4-3
The hand icon allows you to pick up inventory items or explore certain areas. Enjoy the bear! Move the one black ball in the holding spot all the way to the right. Click on the machine on the left for a closer view. Your goal is to move all the black balls to the right and all the white balls to the left. Select the door on the right. Exit out of the Fountain by placing your cursor downwards. The object is to adjust the gears in a certain order to show the wires. Make sure you get the SNAIL! Notice the numbers 8, 35, and 62. Place the crowbar on top of the steps so you can remove the block. You will not know which item goes into inventory until all the items have been cleared from the list. Remove the wallpaper on the left side of the room. Select the wheel on the boiler to the left. Place the Lever from inventory in the empty slot. Travel through the red curtain. The game opens on a likely street with a strange, curvy road and lopsided buildings. Drop the glue bottle on the broken plate. Take the BROOM. If you look at the diagram again it shows you a large, medium and small weight next to the letter L. Drop the helmet on his head. Make sure you grab the PENGUIN! Select the back door. Go back to the Hall by placing your cursor on the left door. PuppetShow Return to Joyville Walkthrough, Haunted Halls: Fears from Childhood Walkthrough, Discover Exciting New Elements in Spellarium 2, Available Now! Pull the lever. Remove the doll with the razor. Select the valve twice. 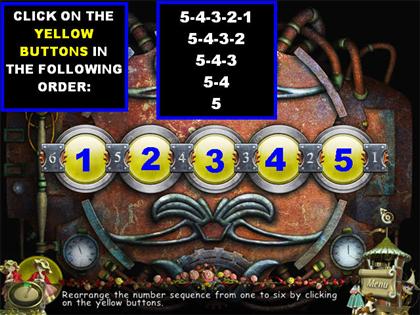 Grab the valve. The puppet will play the piano and a Sheet Music will appear above the piano. Travel through the right door. Remove the fastenings with the hacksaw. Click on the newspaper on the round table for a closer view. You will see the Spider Puppet appear on the window and eventually will go through the door in the Secret Backyard. LEFT DOOR
Complete the hidden object puzzle. Click on the front door for a closer view. Turn the key three times. Once the puzzle has been solved you will be automatically taken back to the bedroom scene. Select the chain on the ground. Your journey will take you into a realm of unsettling events and enigmatic, tortured figures. This area may allow you to move to a different scene or exit out of a scene.
Grab the valve. The puppet will play the piano and a Sheet Music will appear above the piano. Travel through the right door. Remove the fastenings with the hacksaw. Click on the newspaper on the round table for a closer view. You will see the Spider Puppet appear on the window and eventually will go through the door in the Secret Backyard. LEFT DOOR
Complete the hidden object puzzle. Click on the front door for a closer view. Turn the key three times. Once the puzzle has been solved you will be automatically taken back to the bedroom scene. Select the chain on the ground. Your journey will take you into a realm of unsettling events and enigmatic, tortured figures. This area may allow you to move to a different scene or exit out of a scene.
Select the back door. Grab the MOON and place it in the slot near the owl. Select the helmet to find the PHARAOH. Select the door at the top of the stairs. Complete the puzzle. Select the blue cover to find the COCKEREL. Place the fingers on the puppet. Go back through the trap door and place your cursor in the following manner:DOWN If your inventory is full, use the arrows on each end of the Tools section to scroll through your items. If you click on the door on the left it will show you a closer view of the door. Place the Mask from inventory in the empty slot. Finish the hidden object challenge. Click on the newspaper on the ground and it will show you an article that states the Joyville Museum is closed. Move the handkerchief to find the CORN. Select the fire hydrant. Click on the plaque next to the door for a closer view. Once finished, select the piece of hair on the balcony. Grab the poker. You have made your way this far, but the curtains of the puppet show can always draw closed and put an end to your journey. Once the scale is balanced the door to the Theater will open. Click on the Oil Can in the lower right side. Click on the sparkly area upstairs to search for items. Drop the penguin head and penguin flippers onto the strange looking plane. Make sure you get the PINCERS! Select the pipe. Select the grate on the side of the water pump. Select the drawing on the wall. Travel back once. When the wires are connected correctly the center of the connectors will light up. To exit the Corridor, point your mouse downwards. The goal of the puzzle is to match the dolls with their respective seasons that are on the board. Place the hose on the hydrant. Tread carefully, or return to safety before taking the plunge. DOOR ON LEFT Use the master key on the lock. Click on the bed covers for a closer view. Subscribe and get daily new escape games by email. Drop the ARROW on the archers bow. Take the oil can in the center of the room, near the ceiling. Drag the brush to the shoe polish to make the DARK SHOES. Place the fader on the zipper. Use the Fishing Lure on the hole to pull the Clock Key out. MIDDLE 2X, Once youre done with the levers, they should be in the following positions from left to right:LEFT ALL THE WAY FORWARD Select the book located on the table. Grab the weights from inventory and place them below the letter L. You can choose to go through the games tutorial at the beginning of this level. Select the woman. Select the jacket to find the MITTEN. Once all the pieces are in place, grab the Puzzle Piece in his mouth. Once the runes have been placed correctly, the door will open. Drop the heart near the bottom cherub to begin a new puzzle! Place the 2 Numbered Buttons (number 2 and number 11) in the appropriate empty spaces on the device. Select the second chair cushion from the left to find the PYRAMID. A Red Rune will appear in the upper left side of the curtain after the Spider Puppet has disappeared. Pick up the knife on the right side of the bar. Select the board. The strange tailor will welcome you into her collection of ball gowns and ancient supplies. Make sure you find the HAND CRANK! BACK OF SCENE. Select the curtains. Drop the bandage on the pipe. Drag the item you want to use to the appropriate area and click on it to make it stick. The Spider Puppet is going through the book on the desk. Select the box on the desk. Grab the FLOUR. Select the motor. Simon, your grandson.. Select the lapel to find the FEATHER. PuppetShow Return to Joyville Prince Mannequin Armor. Make sure you get the PENGUIN FLIPPERS! Speak with the puppeteer. Once you complete your search a Set of Gears will go into inventory. Please report any spam or unwanted comment by contacting us. Pick up the Punched Card and it will go into inventory. Grab the polygon. Delicious Emilys Miracle of Life. Arrange the jockeys so that they finish in the same order depicted on the suitcase. Your journey will follow the path Felicia takes through her fathers maligned stage and town. The solution is: 4, 2, 5, 10, 9, 13, 10, 3, 11, 1, 6, 8, 12, 7, PuppetShow Return to Joyville Spring Puzzle Solution. 9-6. Drop the board on the railing. Complete the hidden object challenge. Your goal in this puzzle is to have both bars add up to the same number. If the gear is not in the right spot it will go back where it came from. Place the spring pin into the lock to begin a new puzzle! A single sparkle indicates an interactive area in the game. Take the axe that will drop.
Make sure you get the POT! Look inside the bag to find the bicycle key. Select the knife to find the AVOCADO HALF. Select the sewing machine. The point of the puzzle is to arrange the hands holding the puppets hair into a certain order.
PuppetShow Return to Joyville Number Dial Puzzle Solution. Select the lamppost next to the garden fence. When you use a hint, a circle will appear around a random item from your list. Once the panel is open, open your tools, grab the gears and place them on the mechanism. 9-6 Close the drawing, click on the fireplace for a closer view and find all the objects on the list. Select the box to find the BALL. Select the door on the left. Pick up the Fishing Lure on the left chair. Pick up the Oil Lamp on the top left side. Complete the hidden object puzzle. Pick up the Bronze Statuette in the center of the balcony. If you place your cursor in the back of the scene you will be taken to a gate. Select the button. It is a drawing of the Spider Puppet weve been seeing in different areas. Do you have the courage and fortitude to finish the path you started? Your goal is to place the runes in the right order at the bottom of the apparatus. Grab the Punched Card and place it in the slit on the lock. Select the pastry bag. Select the chessboard to find the QUEEN. Grab the lady. Your goal in this puzzle is to move the pieces on the left onto the appropriate spots on the right.