
 If you are working alone on a relatively large assembly, its sometimes helpful to insert one screw at each side before the carcase is fully squared up to keep the parts joined together. Face frames cover plywood edges. Next, predrill for the screws that will tie the sides together with the floor. Clamp (without glue) to the carcase. Unless youre running a production facility where you build things in multiples to standard sizes, you should take the building work in stages. To compensate for the frame overlap, add a 14 " spacer between the cases toward their backs and between the clamps [first photo below]. Using the plywood thickness to set the stacked dado width, cut a 38 "-deep dado on the inside face of each side piece to accept the bottom. We may receive a commission from sales referred by our links; however, we have carefully selected these products for their usefulness and quality. It should just touch the teeth of the blade. After ripping, cut the parts to length.
 Shim the bottom edges to level the cabinets and make the face frame edges parallel with each other. We applied face frames with a simple butt joint and glue. that could pull the cabinet sides away from the cleat if gravity alone were holding the cabinet in place. Cauls protect the face frame. Build the face frame from solid wood to match or contrast with the sides. Popularwoodworking.comis a participant in the Amazon Services LLC Associates Program, an affiliate advertising program designed to provide ameans for sites to earn advertising fees by advertising and linking toAmazon.comand affiliated websites. Use longer screws as needed for your hardware. Hows this differ by design and implementation with the kicks? Be sure you add an identifying mark (for example: upper 1, left side) to each part as you cut it. Lay out the positions with a long square. Over the years, cabinetmakers have standardized some cabinet dimensions based on practical considerations, such as the average height of people. Its ideal to make the first rip slightly over-width, then turn it around and rip the other edge to the size you require. Here are some supplies and tools we find essential in our everyday work around the shop. Check that the top stile ends sit flush with the top ends of the case sides. That way youll have a chance to adjust the different parts to fit what youve made so far, instead of finding that your face frame is 1/16 too narrow or you cut the recess for your kick 14 too high. For a base cabinet less than 4' wide, you can cut all the parts except the back and toekick from one 34 "4'8' sheet of plywood or MDF. Mill the stock for your face frames to thickness and width but do not cut anything to length until the cabinets are assembled. Direct measurement is the quickest, most accurate way to go: Start with stiles, setting a squared end on your shop floor for face frames with stiles that go to the floor; for cabinets with fully recessed kicks, start at the top and mark the location of the cabinet floors under- side, then add 12 (or however much you want the face frame to hang down, which will hide the joint between the cabinet and an applied kick). Rear drawer glide mounting bracket no. Then rely on the scrap to locate the divider while you drill pilot holes with a countersink/drill bit and screw it in place. 4) A dado blade speeds cutting tenons on the rails, but multiple passes with a general-purpose blade will do just as well. Next you'll need a countertop sized to overlap the front or both the front and sides about 112 2". I generally make shelves from the same 34-thick veneer-core plywood as the carcase and add a solid front lipping to finish the edge and increase rigidity. Drill, then screw. You'll fill the gap with the face frame overlap on the sides. Im sure there wouldnt be much adjustments once the cabinet is loaded but it would help a lot in the initial organizing. Although I cant recall which type of joinery we used for the tops, I know we werent using biscuits; I didnt encounter a biscuit joiner until I moved back to the United States. Then subtract 1" from the drawer opening width in the frame, and cut the front and back to that size (121116 " for this example). You can join face frame parts using everything from dowels to half-laps to mortise-and-tenon joints, but we like pocket-hole joinery. Im trying to build and design a cabinet where placement of the drawer slides is adjustable and the drawer glides are mounted to threaded inserts installed like shelf pins. Spacers for the win. At this point the clamp is just to hold the parts together while you insert the top (or top strips); there will be time to adjust the fit and get things square. On the bottom inside edge of each piece, cut a groove 14 " from the edge to accept the drawer bottom. Thanks for your comment.
Then notch the bottom front corner of both side pieces for the toe kick [below]. Otherwise you may find that your divider is too small. Hold the door in position centered vertically in the opening, and mark each hinge screw mounting location (at the center of each oblong hinge screw hole) along the frame edge. My method for joining cabinet floors to sides may not be refined, but its quick, simple and strong. The pre-finished side goes to the cabinet interior; it saves a lot of time, which helps make my work affordable. Hold one squared end of the divider stile in place and mark the other, then cut. Which hand planes should a power-tool woodworker buy first? Rip first. Maximize the efficacy of glue. A batten screwed to each side of the foot allows you to attach it to the cabinets underside. Theres also a 3 sided rail that can be mounted to the pullout if more height is needed in the drawer. Its an exaggeration, I know, but it gets at a basic truth about the world of cabinetry and built-ins: There is no single right way to build them. Here are the techniques for making them blend into a room. I have chosen materials and methods that make sense for my business, given my clientele and the styles in which I specialize. Cut grooves in both stiles and rails. From 112 "-wide stock, cut the top and bottom rails.
Much of my current carcase-building technique comes from what I learned at a contemporary furniture business in Vermont. Then mount the glides [below] on the case and on the lower edge of the drawer box side according to the product instructions. Glue each tenon, assemble and clamp the drawer, and then check for square. Next I usually tackle the hanging cleats, through which the cabinets will be screwed to the wall. Then drill screw pilot holes and install the hinge. However, this does not impact our recommendations. Unfinished garage becomes a woodworking haven. Adjust the fence until you cut a 38 " tenon on test scrap that just bottoms out in the stile grooves. No tricky drawer-glide installations.
All Rights Reserved. Make the front of the drawer box flush with the frame. Direct measure again. If you need to allow for uneven walls, make the stiles 214 " wide, and later trim the overhangs on the sides to fit the opening. Place the template on the drawer front panel [below], and drill the hardware mounting holes. Then glue the dado on the other side panel dado and mount it on the bottom. Now apply glue to the biscuit slots for the top (or top strips), insert the biscuits and set the top in place. You can make doors using just your tablesaw and a general-purpose blade to cut the joints. Want to learn more about built-in cabinet installation?
Refer to the hinge instructions for details on adjusting the door position. At the first shop where I worked, a custom cabinetmaking business in rural England, we built casework out of melamine-coated particleboard. A dead-square cabinet requires a dead-flat assembly surface to avoid twisting the glue-up. Set the cabinet floor in place between the sides and clamp loosely.
 ), or style (slab doors or frame-and-panel?). Predrill for the screws using a bit just smaller than the shank of your screws. Find plans for a dead-flat, torsion-box assembly table here. Repeat with the bottom rail.
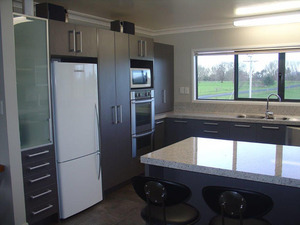
 No fussy alignments. I rarely put shelves in base cabinets, but I do use them in upper cabinets and in shallow base units such as bookshelves. One of the essential parts of a design is kitchen cabinets, which provide a structure to create work areas and store everyday items like groceries, cookware, and crockery. The prefinished side goes toward the interior.
Clamp position is important. Sink bases, in particular, do not need a solid top; the vast majority of a sink bases top will be cut out to accommodate the sink. You can remove that screw if necessary, then redrill and replace it once the cabinet is squared. Let Mother Nature be your co-designer as you build dazzling projects with wavy edges, bristly burrs, bark inclusions, and other flaws that give wood a look of unrefined beauty. Four or five are plenty for each side of a typical base cabinet. By the 1930s the recessed kick had become nearly ubiquitous no surprise, considering how much easier it is to install than a flush kick that has to sit on an uneven floor. Then cut two stretchers that length to space the front drawer stretcher that distance from the front top stretcher and pocket-hole-screw the drawer stretcher in place [below]. Kitchen base cabinets are particularly beneficial for easy access and heavier items. This method also makes locating the divider a snap when youre ready to screw it in place. If the bottom of the cabinet will be holding flower vases that are 12 tall, there may not be any point putting shelf support holes lower than about 13 above the cabinet floor. You'll also cut the middle rail beneath the drawers 2" wide. For safety, the attachment cleat must be firmly fastened to the carcase, otherwise a cabinet could be separated from the cleat and fall off the wall, with potentially fatal results. That way youll have two square, clean edges for joinery.
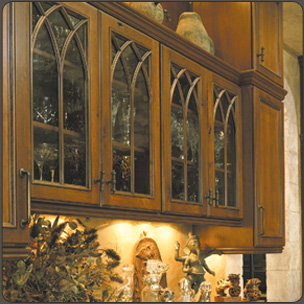
A toe kick allows you to stand closer to a cabinet without bumping the front with your feet. Double-check the material thickness before calculating cabinet sizes and cutting dadoes and rabbets. Label them left and right with pencil marks on the inside faces. If you'll stain the doors, stain the panels before assembling the frame. The sample base and wall cabinets shown below have these features to make building them as simple as possible: The cabinet cases shown here were made from birch-veneer, medium-density fiberboard (MDF)-core plywood for economy. For a recent job, Hiller built new cabinets, such as the sink base visible here, on details drawn from the surviving original built-in at right. Apply a couple of clamps to hold the assembly together while you adjust the fit. Glue guide. Test the saw settings in scrap; then cut dadoes at both ends of the two sides. Best Buy Rigid Kitchen Units April 2021. My typical material for kitchen casework is 34 maple-faced veneer-core plywood, pre-finished on one side. Five or six screws are usually ample for a 24-deep base cabinet. Top joint. For vertical dividers, wait until you have the main part of the face frame screwed together so that the spacing of all the parts is locked in.
(Our drawer bottom sheets measured 14 " thick.). Calculate the height of the space that will be beneath the cabinet floor and rip spacers from scrap plywood to this width, then cut them to length. Learn about 4 types of hinge installation for face-frame cabinets. Most base cabinets do not need a solid plywood top. Clamp the cabinet face frames together while you screw them to the wall and each other, ensuring the faces are flush. Subscribe . In general its a good idea to center the front shelf support holes about 58 on center behind the back face of a shelf lipping that hangs below the underside of the shelf. The next step is to cut your basic parts (sides, tops and cabinet floors) to size. If your kick will be flush, the spacer should be a hair under the width of the cabinet sides in length; if the kick will be recessed, the spacer should be a hair under the width of the cutout portion at the bottom of each cabinet side. Then cut a groove the length of the scrap. If you'll add an adjustable shelf within the case, lay out and drill shelf pin holes on both sides. Remount the doors and drawers, fill up your new cabinets, and start scouting other locations in your shop, garage, kitchen, or bathroom for new cabinet-making opportunities.
Relax. Copyright 2022 Meredith Corporation. The drawer slides we recommend provide lots of mounting flexibility and the chance to undo minor mistakes. With the vertical divider in place, repeat the same steps to size and install these rails. Make sure the bottom face of the cabinet floor is tight against the top edge of the spacers; the bead of glue along the spacers top edge will contribute to the cabinets strength, especially if you are using plywood thats pre-finished only on the interior face and so offers few opportunities for gluing. I stagger the battens, putting one toward the front, the other toward the back, so that I can screw into them from the opposite side of the support foot. After squaring the cabinet, sight across the top edges to check for winding. Drill pocket screw holes at the ends of the stile and insert the stile. Run a bead of glue along the top edge of each floor spacer then stand the sides on the floor, front edge facing up. At the same time, take any lipping at the front edge of the shelf into account. Begin by cutting 2"-wide stiles 18 " longer than the dimension from the toe kick cutout to the top of the case (31" in this case). Apply glue to the case edges; then center the frame between the case sides with the lower frame rail inside edge 18 " above the inside face of the case bottom. Make sure that the top edge of the bottom rail is flush with the floor of the cabinet; do the same with any critical inside or outside edges. You can use the same setup to cut 38 "-deep rabbets along the inside back edge of the sides to accept the cabinet back. To calculate the front drawer stretcher position, add 1" to the height of the drawer boxes you'll make. Calculate upper cabinet sizes the same way. As your wrote, there are as many ways to build a cabinet as there are cabinet makers. Some people start with face frames then build their carcases to fit.
 Steady on. After the glue dries, cut the back to fit. Place a hinge cup in a hole with the straight hinge edge parallel to the stile edge [below], and mark the center of the mounting screw slots. All rights reserved, 2018 Anarchists Gift Guide, Day 9: Granite Floor Tiles, The More Things Change, the More They [Change]: The Culture of Paying Dues, Free Woodworking Downloads From Lee Valley, I Can Do That! Designing a Traditional Plate Rack by Nancy Hiller. Cut both halves of the joint on your tablesaw. The most accurate way to determine a dividers length is by setting one end in place and marking the other. We made ours from two sheets of MDF edged with maplea practical choice for shop use. To ensure the groove is centered, turn the scrap end for end, and make a second cut [below]. If your cabinets have a flush kick, as does the one in this article, youre home free at least until its time to scribe the kick to fit the floor. Cut the upper and lower vertical dividers to fit between the middle rail and the top and bottom rails. The screws won't show after you glue the frame to the cabinet. Kitchen wall cabinets help maximise the space and offer additional housing for ingredients. Simple and strong. For safety and accuracy, clamp the cabinet side in your vise and hold the biscuit jointer firmly against the fence to make a square cut. As long as I cut all rails the same length I will get a nice tight joint and dont have to fit them to an existing box. At the next shop, also a rural English operation, we made casework out of solid pine floorboards. You can then cut multiple parts to the same length by crosscutting with the rip fence. Imagine all the potential pitfalls about making drawers. https://www.popularwoodworking.com/wp-content/uploads/popwood_logos-01.png, https://www.popularwoodworking.com/wp-content/uploads/2018/11/custom_cabinets6.jpg, 2020 Active Interest Media. Measure and center the back drawer stretcher flush with the bottom of the front drawer stretcher. Clamp the frame in place, including the middle rail to the drawer stretcher [below]. Consider one of these three other clear finishes for your next project. Get your copy today on shopwoodworking.com.
 You can buy a special clamp to hold the rails and stiles in place, but I simply clamp the parts together on my bench, making sure theyre square. Drawer glides: Blum 20" three-quarter extension glides no. Hinges: Compact 38N Screw-On no. It would be good to see this on a video as I didnt follow all the steps. That way your divider will even up the height of the cabinet near the center.
Direct measure. The hardware we recommend allows many ways to fine-tune the position. Once professionally fitted, they provide a strong structure that forms the base around which other features can be built.
To allow built-in cabinets a margin for unsquare walls, design the case 12 " narrower than the opening between another cabinet and a wall or between two walls. Difficult? Assemble a frame-and-panel drawer front as you would a small version of a cabinet door. Clamp the spacer in place at the bottom of the cabinet side and attach with 114 Twinthread screws. Of course, you cannot insert that divider until youve cut it. Yay! I store my plywood on sturdy sawhorses near the table saw so that I can pull one end of a sheet over to the edge of the saw, adjust it against the fence and rip. (European-style hinges require 35mm holes, but a 138 " bit is close enough.