Clear editor. For a better experience, please enable JavaScript in your browser before proceeding.
Got the new 25 spline in. If you didnt install the 2-4 band correctly this wont go in. endobj Down on the output shaft, inside the planetary, there is a snap ring. Repeat all above instructions as necessary until you have your unwanted shaft out. JavaScript is disabled. First off you will need a few parts for this. Remove the left hand shift solenoid.
I used the rubber handle of my hammer. Luckily you can find shot-peened, cryo-treeted, electrical induction treated, billet, etc shafts all over the internet. This will give you an idea if there is something wrong with your transmission). There are 7. Remove the low roller clutch assembly, red and yellow arrows above. endobj If it did come out skip the entire next section and go to reassembly. This pin needs to be just barely below the valve body surface. Way more cost effective, I'm in Ireland so I think sourcing a used trans will be very difficult :(. Install pan and torque bolts to 9 ft. lbs. Since the transfer case is a power distribution unit to all four wheels, failure of the transfer case will render the vehicle useless, so an obviously leaking transfer case output shaft seal should be repaired immediately to protect the expensive unit. Neither link talks about removing the bearing that has the gear that is partially blocking the "coffee can". Risk factors that could cause the output shaft seal to fail prematurely are lifted suspensions that alter the driveline angle, a worn drive shaft yoke, worn transfer case output shaft bearing, or lack of maintenance. Press out your output shaft and reassemble these parts in opposite order.
You can post now and register later. This part is important. Install new o-rings onto the oil pump bolts and install them. This part is really messy, so have a bucket or pan ready to catch the transmission fluid as it drains out the rear. Make sure your work area is really clean and closed up (i.e. I'm hoping it was a manufacturing defect and not increase loads due to the diff, but if my car does another 150000kms on this new bearing then the car will most likely be near falling apart by then anyway. Press question mark to learn the rest of the keyboard shortcuts.
 I just lowered my hoist carefully until my transmission was lying down on the floor (carefully). I will try that tomorrow. Once the valve body is clear and you have accounted for the check balls, remove the 3 bolts and spacer plate support plate. This guy is real fun. Upload or insert images from URL. Theres no easy way to do this. Flip your pump and apply trans gel to the pump bore where the o-ring is. Essentially itll be piston, 3-4 spring, valve body spacers, 1-2 spring, cover. Just like the shaft from the transmission, the two shafts that the transfer case uses to send power to the front and rear wheels are called output shafts. Come join the discussion about performance, modifications, VR4 turbo upgrades, troubleshooting, maintenance, and more! Rotate until seated. I ended up with a leak from the front output shaft seal after doing my "re-gear" mod, the final shaft that runs through the engine moved back and rolled/damaged the seal. The outer casing of the output shaft seal is metallic, and is pressed into the output shaft housing, sealing it externally as well. Otherwise, torque the bolts to 8 ft. lbs. Notice the housing is below the oil pump seat. Ensure the snap ring is seated. The Fora platform includes forum software by XenForo, Duramax First Generation: 2001-2004 (LB7), Duramax Second Generation: 2004.5-2005 (LLY), Fuel System, Air, Exhaust & Emissions Upgrades, VerticalScope Inc., 111 Peter Street, Suite 600, Toronto, Ontario, M5V 2H1, Canada. Technically you are supposed to do this after the Oil Pump removal, but I popped it out prior as it was holding my pump up. This next part is interesting. You must log in or register to reply here. Maybe you're getting stuck in two gears at once (1/2 is already engaged, and then you're also able to go to the other gears). stream
You can use a little trans gel to hold it in place. Just some food for thought if your drive shaft turns out to be good, mine wasnt 400 bucks later.
I just lowered my hoist carefully until my transmission was lying down on the floor (carefully). I will try that tomorrow. Once the valve body is clear and you have accounted for the check balls, remove the 3 bolts and spacer plate support plate. This guy is real fun. Upload or insert images from URL. Theres no easy way to do this. Flip your pump and apply trans gel to the pump bore where the o-ring is. Essentially itll be piston, 3-4 spring, valve body spacers, 1-2 spring, cover. Just like the shaft from the transmission, the two shafts that the transfer case uses to send power to the front and rear wheels are called output shafts. Come join the discussion about performance, modifications, VR4 turbo upgrades, troubleshooting, maintenance, and more! Rotate until seated. I ended up with a leak from the front output shaft seal after doing my "re-gear" mod, the final shaft that runs through the engine moved back and rolled/damaged the seal. The outer casing of the output shaft seal is metallic, and is pressed into the output shaft housing, sealing it externally as well. Otherwise, torque the bolts to 8 ft. lbs. Notice the housing is below the oil pump seat. Ensure the snap ring is seated. The Fora platform includes forum software by XenForo, Duramax First Generation: 2001-2004 (LB7), Duramax Second Generation: 2004.5-2005 (LLY), Fuel System, Air, Exhaust & Emissions Upgrades, VerticalScope Inc., 111 Peter Street, Suite 600, Toronto, Ontario, M5V 2H1, Canada. Technically you are supposed to do this after the Oil Pump removal, but I popped it out prior as it was holding my pump up. This next part is interesting. You must log in or register to reply here. Maybe you're getting stuck in two gears at once (1/2 is already engaged, and then you're also able to go to the other gears). stream
You can use a little trans gel to hold it in place. Just some food for thought if your drive shaft turns out to be good, mine wasnt 400 bucks later. Remove the Oil Pump by pulling upwards. The manual calls for a special tool to compress the cover, but just grab a block of wood and a mallet and carefully give it a whap until you see the cover depress in a little. While carefully reinserting the manual valve link, put the valve body onto the transmission carefully, making sure none of the check balls fall. If you are reusing this transmission, you can insert your output shaft now to aid in assembly of all of the low/reverse clutch parts. Like other shaft seals, the transfer case output shaft seal is a continuous circle made of a synthetic rubberized material that conforms to the surface of the shaft and allows the shaft to rotate freely inside the seal. For mine since I went from RWD to AWD, I installed my new transfer case adapter.

Pat yourself on the back, the hard part is done. Not sure where you are, but yes, it is possible to replace the bearings. I would think the biggest credit has to go to Ray Pampena! This is variable among models, years, and aftermarket/factory. I'm not going to cry if you criticize me, I care more that the correct info is out there for the people who need it. Remove the O-ring seal from the end of the input shaft. Advertising - Make sure you are inspecting all these parts for damage. Please help me. Once you think its seated it should look like this. The AWD has a short "stub" shaft that goes into the NV-149 Transfer Case adapter, then T-case, which connects to the driveshaft. A buddy of mine (stoondesiel) had a vibration with his Tahoe and got his drive shaft check it was all good but still had the vibration he blew up his diff and replaced it and the vibration was gone. Go ahead and recheck your input shaft end play and make sure you are still within spec. Be careful. using the aforementioned pattern. Next parts a little tricky/fun. There are multiple spring colors, which can be used in either the 1-2 or 3-4 accumulator positions. RPS full face clutch, Fidanza flywheel, ATR downpipe, TurboXS dual stage boost controller, K+N fipk, Turboxs h34 bov, Kormex 25 spline, recall transfercase. And literally start wiggling the crap out of it back and forth until you feel it seat all the way down. <>/ExtGState<>/Font<>/ProcSet[/PDF/Text/ImageB/ImageC/ImageI] >>/MediaBox[ 0 0 960 540] /Contents 4 0 R/Group<>/Tabs/S>> Now remove the servo cover. Transfer cases are driven gear units that accept power input from the transmission output shaft, convert that to two separate outputs, and sometimes changes the output to a different speed than the transmission is spinning. To keep tension between the rubber, watertight seal and the output shaft, there is a spring inside the seal that constantly applies light pressure inward towards the transfer case output shaft. <> If using a hoist, make sure you have a lot of chain so there is enough room to remove the oil pump later. Silikhan Publishing Group & SilveradoSS.com If you are in my position and are doing this for the AWD/RWD swap, you may have just pulled out your replacement shaft. Unfortunately the mechanic wasn't able to source a better bearing (the bearing comes from some Eastern European country of questionable quality), ended up replacing it with the same part, at least its quiet again. Remove the clip holding the left hand shift solenoid in. At this time you will be moving up to the Oil Pump. It seems that in warranty ford just replace the whole trans, has anyone done this out of warranty? 1 0 obj Next grab your Trans Gel/assembly lube and coat the inside surface where the oil pump resides. Account for your input sun gear. At this point, there will be clearly visible fluid marking the storage location of the vehicle, and there may be a slightly foul or oily smell around the vehicle after operation. Alright, I've seen many posts and questions in the last year or so about doing the output shaft without pulling the tranny. What could I have messed up.
Remove your filter seal. Im dropping the car into a main dealer this week for a server anyway so was going to get them to check it out, but I'm afraid they will just replace the whole transmission. Over time, droplets will begin to form at the base of the transfer case output shaft housing, and possibly trickle down the drive shaft. Make sure your shaft is perfectly clean of dust or contaminates before doing so. I got lucky on one, not so lucky on the other. Do Not Sell My Personal Information -, By logging into your account, you agree to our. Use a towel and some channel locks to grip it if you need to. Seat your input sun gear onto the output shaft and input carrier. They are in there pretty tight, but dont use an impact. Archive - Also be sure not to damage the protruding screens. We are working every day to make sure our community is one of the best. Torque to 8 ft. lbs. Now flip the whole assembly over (while maintaining pressure to ensure the two pieces stay together) and align the clutch discs inside the input housing.
Your welcome. If you have a manual and patience this can be done in a few hours. Terms of Service - Remove the bolts holding the lock-up solenoid in place, then remove the solenoid. These are Lock Ring Pliers. I had a hard time getting the cover back on with all the weight of the gears pulling the shafts down so I used a jack under the cover to help me lift everything back into place as I worked the cover dowel pins back into the holes. Wrench and Fiix offer Roadside Assistance and Towing throughout the United States: (866) 335-0761. Make sure to align all of the holes. The transfer case sends power from the engine to the front and rear axles in AWD or 4WD vehicles. DO NOT TRY AND USE A NORMAL T50 TORX. First install your one lone check ball into the case where the accumulator goes. We'd really appreciate it. Transfer Case Output Shaft Oil Seal Replacement Cost Estimates, Brake Master Cylinder Reservoir Replacement, Variable Valve Timing Control Solenoid Replacement, Free Chevrolet Suburban 1500 repair estimates, Chevrolet Suburban 1500 reliability ratings, Chevrolet Suburban 1500 Maintenance Schedule. I had used JRC's when I did mine (which was also helpful). A few revised parts here and there, and boom a transmission that can still barely handle the power being put into it. You'll need a good mechanic who is confident in pulling the box apart. It may not display this or other websites correctly. The shifter will not go into 1st or 2nd gear position. I ended up taking it to a locally owned transmission and drivetrain shop.
Its in the way of the next step. And FINALLY, the Internal Reaction Gear and output shaft. If you happen to lose one or more of those balls let me know. Next is your input housing and reverse input housing.
 There is no output shaft bearing. D-Tech Pmd, Diamond Eye 4" turbo back exhaust. Turns out it's pretty easy to change. Oh god I hope its that easy. Remove the bolt holding the manual lever detent spring on, then the spring itself. Go ahead and bolt on your valve body spacer support plate. If you are reusing this transmission, you can insert your output shaft now to aid in assembly of all of the low/reverse clutch parts. 4 0 obj
If you don't remove the little cover (look for a piece with only two bolts on it) the cover will be EXTREMELY hard to remove. Take note of location and orientation. Sometimes builders use an adhesive to lock the two together for assembly, but this is supposed to be temporary. Torque bolts to 8 ft. lbs. Remove your transmission pan bolts and pan at this time. Well I thought everything was going smoothly. If you are reading this as part of the AWD/RWD swap then make sure you install the proper tail section. 180k service done thanks Clint. Clutches on left aligned to seat over the gear on the input to the right. Dont fret, just grab and cut the seal holding it up. Next remove and toss your old filter (if you are feeling curious pry it open and check to see whats inside. You will probably need to maintain a little pressure against the cover; you can do it with your hand. Before I start this I should point out that I am in fact not a Transmission specialist. Also the valve body is attached via the manual link/valve so you will need to maneuver that out. %PDF-1.7
I just installed my 300M shaft, so I thought I would offer some tips. Finally install either your extension housing or transfer case adapter with new seal and torque to 26 ft. lbs.
There is no output shaft bearing. D-Tech Pmd, Diamond Eye 4" turbo back exhaust. Turns out it's pretty easy to change. Oh god I hope its that easy. Remove the bolt holding the manual lever detent spring on, then the spring itself. Go ahead and bolt on your valve body spacer support plate. If you are reusing this transmission, you can insert your output shaft now to aid in assembly of all of the low/reverse clutch parts. 4 0 obj
If you don't remove the little cover (look for a piece with only two bolts on it) the cover will be EXTREMELY hard to remove. Take note of location and orientation. Sometimes builders use an adhesive to lock the two together for assembly, but this is supposed to be temporary. Torque bolts to 8 ft. lbs. Remove your transmission pan bolts and pan at this time. Well I thought everything was going smoothly. If you are reading this as part of the AWD/RWD swap then make sure you install the proper tail section. 180k service done thanks Clint. Clutches on left aligned to seat over the gear on the input to the right. Dont fret, just grab and cut the seal holding it up. Next remove and toss your old filter (if you are feeling curious pry it open and check to see whats inside. You will probably need to maintain a little pressure against the cover; you can do it with your hand. Before I start this I should point out that I am in fact not a Transmission specialist. Also the valve body is attached via the manual link/valve so you will need to maneuver that out. %PDF-1.7
I just installed my 300M shaft, so I thought I would offer some tips. Finally install either your extension housing or transfer case adapter with new seal and torque to 26 ft. lbs. Install the Pressure switch onto the valve body with the proper bolt orientation. :bigok: If you put a jack under the hub you can raise the control arm an inch or two and get the long bolt out. Nice job. It may be on your filter or still stuck in the tramission. Hopefully someone can verify that? Not kidding. Much easier than a full transmission rebuild.
Install the left hand shift solenoid into the valve body and insert the retaining clip. The shorter AWD shaft though does not, so when said stress is exerted, say hundreds of pounds of torque suddenly applied, the shaft will just straight break. It should be in the bottom of your input carrier housing, but may be in the bottom of the case. I dont think its anything interfering with the cables, i didnt even have the hood open. Keep them altogether and in order.
It turns out that I couldn't find the bushing at any parts stores, locally or on the internet. It may be difficult to remove. A forum community dedicated to Chevrolet and GMC diesel truck owners and enthusiasts. JFIF C
Yeah thats a mouthful. For a better experience, please enable JavaScript in your browser before proceeding.
LS1TECH - Camaro and Firebird Forum Discussion, 2-Speed thru 10-Speed GM Autos | Converters | Shift Kits, 2yr Wrty Trans/conv combos. If you are cheap then do this.
3 0 obj Lastly, I definately recommend sealing the trans with RTV before putting that cover plate back on. Then the front and rear universals made me think front and rear shafts the yoke does not go in a bearing, it goes in a bushing, you take the output housing off and you can drive the seal and bushing out and tap in the new ones, i usually use a little rtv, well i actually use permatex right stuff as you can get oil on it right away, the torque cant be much as i tighten with a wrench and its in aluminum. Remove the Band Anchor Pin. I am going to guess that you have the same T case as I do which is the 243c. Install all of the remaining 7 check balls onto the valve body with a dab of gel to hold them in place. You dont want any foreign material getting into it. First clean up the transmission well. Im almost ready to give up on this car. Get ready to catch them if you have your transmission vertical. Its called your hands. Your link has been automatically embedded. Once you pop it in a little you will remove the snap ring holding it in. Anyway make sure your accumulator is properly assembled. Next you will be removing the servo cover. Oh did he design it himself? Once you do that you should be able to carefully remove the harness from the valve body. Youll need to carefully support the reaction gear to do this to avoid damage. Below is the rollers. Come join the discussion about duramax engines, performance, builds, modifications, classifieds, troubleshooting, maintenance, and more! - 1996 GMC Ext Cab Short Box 1/2 Ton - 2wd - 6.5TD - 400000KM - Vin Code S - F Lower Intake - Peninsular Upper Intake - 3" Home made Exhaust from turbo to back - No Egr - No Vac Pump - Remote PMD location In Airbox - Turbomaster - Ramair Coldair Aircleaner Box - 6" By 10" Round K&N Air Filter - Autometer Boost, Trani, Pyro and Oil Pressure Gauges - Fuel Pressure Grauge - Stripped all A/C Components - Fed The Beast - Snow Performance WMI 2x1GPH Nozzels - #9 Resistor - Firestone Airbags In The Back, - Areo Racing Rims and Cooper Cobras Holding it all to the Ground Somewhat -. (starting to see the trend?). Refer to previous pictures for check ball locations. This is accomplished using a round rubberized seal known as the transfer case output shaft seal. I would pull that side plate off that holes the three balls in, pull them out, and esnure you can run through all the gears that way, and then ensure its in neutral when you put it back on. If you arent so lucky, its because your output shaft is stuck in the reaction gear.
Disconnect all of the electrical connectors. In case you didn't know, the only major difference between an AWD and RWD transmission in your SSS is the output shaft. i have the Tru cool max, so finding adapters was easy.
Silikhan Publishing Group & SilveradoSS.com. The RWD has a longer Output Shaft because it has a tail housing going directly to the driveshaft. I found this thread by searching but will keep searching Hmm its been a while, but if you're looking at the back case of the tranny, it should be on the side of it, on the right side. Grab your new/replacement shaft and slide it up through the bottom of your chosen transmission until it seats into the Internal Reaction Gear. This is actually part of a massive retrofit I'm doing over HERE to swap AWD into my RWD SSS. Position and torque sequence. So the long RWD shaft while put under stress actually flexes a bit to help alleviate said stress. ",#(7),01444'9=82. Put it back the way it came out. Remove all the valve body bolts. This part may or may not be a pain. Only did the work that was needed with a head's up of when to expect future service. Finally, if a severe leak has occured while driving, the likely symptom will be a check engine light, in some models, but others will only present a clattering noise from the transfer case, or the transfer case may fail. Same as you are getting some people tell me that it just pops off and others say you have to split the case to get to a clip. It should be between .015 and .036. Before you remove your valve body, take note that there are detent balls that are free floating underneath between the valve body and the gaskets/spacers. Alright at this point you have a few options. The labour hours involved in removing, cracking open, tinkering inside, then closing up the transaxle could equal or add up to more than just swapping a used unit.
$.' Display as a link instead, Torque all bolts to 18 ft. lbs. This site uses cookies to help personalise content, tailor your experience and to keep you logged in if you register. You can find them all over the place online. You need two 1/4" NPS to 6AN adapters (NPS is the straight thread - people argue that NPT will work, but i've heard of issues where the NPT was cracking the case from going too deep or something). stream Make note of where they go. Mark williams took a stock shaft and copied it but made it out of 300M. As you pull the accumulator off take special note of orientation, order, etc. Knowledgable and practical. Update, clutch flywheel and gearbox needs replacement:( Think I will just recondition the box.
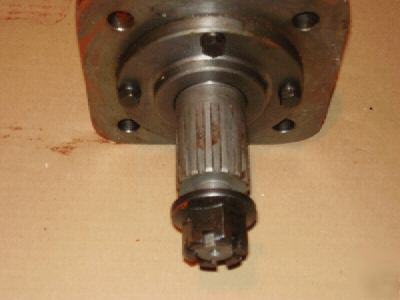
I have 49 left over !! A hacksaw blade with a simple handle or tape can help with removal if you cut through the bushing enough to make a split,it will then collapse some and come out of the tailstock easily-don't cut any deeper than the minimum amount. If you are lucky, your output shaft will come out at this time..IF. Install the 2-4 band. Privacy Statement - Lots of while/grinding in neutral with clutch pedal up and while under acceleration in every gear. If your vehicle has a 4WD, then it's essential that you have the transfer case output shaft seal repaired immediately. Mine ended up leaking and I had to redo it. Let me tell you, I couldnt get mine separated in the case at all. That is another thing that could use some description. The bushing that the yoke rides on in the extension housing is what keeps the output shaft from moving. And dont forget to replace that accumulator piston seal. Three things need to be aligned at this point. Press J to jump to the feed. Why didn't anyone think of this before?! Anyway back on point, one of the many weak parts in this transmission is the AWD output shaft. One of the best car experiences I've ever had. In my case I had a factory transmission from an 04, and a built transmission for an 06. I would highly recommend anyone considering stuff like this to look into a lot of these performance parts before buying into them. Its a bunch of parts down. Install the manual detent spring and bolt and tighten to 18 ft.lbs. Install the small snap ring on the output shaft to attach it to the reaction gear.
I had differences. It should be noted there is a special tool that will hold your output shaft in during the next step, but if you just hold the shaft while you do it, that will suffice. If your harness was held on by the bolts, finger tighten them only at this point and torque after installing the harness. 2 0 obj xeAk@[]iiiB!k6V!wxH.=WEH'%RW Mitsubishi actually designed the output shaft and Mark Williams copied it using 300M material.
Some failures are reported before the 85,000 mile mark, but that is typically not the case. Then grab your T50+ and a breaker bar and remove the 8 bellhousing bolts. As you remove your 2-4 servo take note of how its all assembled. Thank you thank you thank you. Let your pump ride it down til its near flush.
The transfer case output shaft seal is a seal which prevents the transfer case fluid from leaking past the input shaft from the transmission and the front/rear output shaft to the differentials. Most everyone has had their transmission go out or had a friend's who's did. Next up is the anti-clunk spring. Our community has been around for many years and pride ourselves on offering unbiased, critical discussion among people of all different backgrounds. 3-4 clutch plates indexed on the input ring gear, input sun gear indexed into the forward sprag inner race, and reverse input housing tangs indexed into the sun gear shell. Lightly tap your pump down until its seated fully. I'd just swap out the trans for a 16+ model year vs. rebuild. Remove the 2-4 band assembly that you can see sitting near the top in the above picture. About Us - The silverado used to use the 4L60E, but due to increases in power, especially with the SS version, they revised it into the 4L65E. Cookie Policy - Youll get it out a bit and itll likely get stuck. You can apply gel to the orange ring to hold it in place as well. I ran those, with 45 degree fittings, 6 AN lines to an Improved Racing Thermostat (185 degree, with an fittings available), then you'll need 90 degree AN fittings for your oil cooler with 6AN adapters for whatever type of oil cooler you are using. To get to this point remove the following. I asked a transmission shop the other day and they could not remember for sure but were thinking it does just pull off. Ive read a lot of stuff put out by reputable builders (to include FLT) that would blow your mind about some of this crap, like the ole corvette servo. Right below that is the input ring gear and thrust washer. Youll see in the assembly portion. Can't remember exactly what size, but i know that what i was told was wrong and had to run to my local speed shop to find the right fittings.
I was going to give it a shot just have not had the time. If for some reason your reverse input clutch and input clutch housings separated, you will need to line up all of the reverse input clutch discs so that they slide and fully engage over the input housings gear. Powered by Invision Community. You can see some damage on this one, luckily this is my donor transmission. Soon>>>Hotwire + fuel pump, water/meth, The Fora platform includes forum software by XenForo, http://www.vr4stealth.com/output_shaft.htm, VerticalScope Inc., 111 Peter Street, Suite 600, Toronto, Ontario, M5V 2H1, Canada. Hopefully you didnt disassemble this. Then pull out the reaction sun shell and reaction sun gear. You can choose to remove the main wire harness plug on the outside of the case and pull the whole wire harness off, or just hang it carefully aside like I did. Now wiggle it around until you feel the clutches start to engage the gear. Again remember the position of the bolts. All for a competitive price while I continued with my normal day in my own home. The transfer case fluid is a lubricant which helps the gears operate smoothly and in an efficient manner. Best I could find was 48-55 ft. lbs, and possibly use Loctite (Id use blue).
I am assuming Im gonna have to remove the end cover again. Go figure. A used transmission might be cheaper. Pay attention to your setup. Its a rubber neck where your filter inserts. Make sure to do this evenly. In my case it was 3-4 spring, piston, valve spacers, 1-2 spring, cover. Its easier done with the transmission horizontal. Oh, and the built transmission I had didnt have the yellow arrowed piece, which is a dipstick stop. Paste as plain text instead, You are using an out of date browser. That being said, if any actual Transmission Techs out there want to chime in with pointers, correct me, add stuff, whateverplease do so. I will definitely use them again and recommend to my friends. You must be logged in to see the message. <>/Metadata 376 0 R/ViewerPreferences 377 0 R>> The next part is that one important part regarding your accumulator. The average cost for a Transfer Case Output Shaft Oil Seal Replacement is between $111 and $125 but can vary from car to car. Then lastly your bellhousing. dont do this with your garage doors open). Remove that. Did it cost you much if you don't mind me asking? Now using either a bench mount or in my case an engine hoist, get your transmission vertical. Insert all of the valve body bolts (minus the pressure switch bolts) in the appropriate locations (VERY IMPORTANT). Now I had to do some research online to find the bellhousing torque. Then apply a little pressure to the input shaft and pop the rest of the band down in to seat it. Ah I saw the 4x and my brain apparently skipped the 2. Next remove the bellhousing. The valve body is next. I am a general tech who just happens to dabble in everything and try new things.
Anyone who has tried to put high HP into their truck knows that these transmissions are actually utter crap and can't handle power. I did it because my box was making some nice noises and it has a Wavetrac in it. I believe the one RPM put in mine was the transgo mod. Booked and quoted on the phone. Remove the input carrier and thrust bearing (planetary and washer). The play that you have is normal. Remove all of the low/reverse clutch plates. As you are doing this there are pins that you can install to help. Remove the Reaction Carrier Assembly. endobj Its apparently the same as the 241c except the 1 has a shift lever and the 3 has a motor. I just wanted to update this thread and close it out. Connect all of the electrical connections. If you are cheap like me though you can VERY carefully pry the pump up with a hard plastic tool, making sure not to damage the mating surface. How much is a 300M output shaft, and where do I get one? 10/10. This ensures that no oil or dust can exit or enter through the seal. Then the green arrow below is the snap ring holding the next parts in. 98 Burb K25 4.10's 250K miles, new to me, pretty clean and stock. I have been meaning to do a writeup for some time now. Next up is the thrust washer on top of the low roller clutch inner race. Now if you decided to tackle an output shaft replacement/swap you'll find that the ouput shaft is actually close to the back of the transmission and 3/4 of the guts have to be removed to get to it. A failing transfer case output shaft seal will first show signs of seepage, that is, the drive shaft and output shaft housing will begin to show signs of contact with oil, though droplets of oil may not be forming underneath the seal. They should stay in thanks to fluid friction, but just in case. First, there is another check ball under here. Pasted as rich text. If you do not have it taken care of, it can lead to the vehicle becoming inoperable. I'm not a genius and i'm also writing this up months after i actually did it, so i may have missed something or typed it wrong. Remove the tailhousing or transfer case and adapter, whichever one you are working on at this point (new seal needed). Install your new oil pump to case gasket. I thought MW Enterprises designed and machined it. Your previous content has been restored. Its hard to say, but it could just be something simple as your cables are getting caught on your wiring harness or something, so check that first, of course. These are covered with oil inside the transfer case, but must have a means of keeping that oil from draining out of the output shaft housing. In fact look at it from the valve body side and look for this alignment. Just dont be violent. $1170 Refresh after wrty, No Core , Dyno test, Gen 5 Camaro Tuning, Diagnostics, Dyno results, Hot Rod Power Tour/ Pump Gas Drags/ Drag Week. <> Tighten the bolts to 8 ft. lbs.