 The top face of the board is now planed using the thickness planer. Power-plane the board down to the marks (Photo 2). 3 years ago. Normally, the end would now be squared to the face AND edge, but I'll assume you're going to use a table saw for cutting to length, so I'll omit it at this time. The sled is simply a piece of 3/4-in. Buy a few. Good luck, and have fun! Two 2" wide strips were then cut from 3/4" plywood. Joint a really wide board with your planer using a shop-made sled. I picked up a bunch of old oak beams recently, and have been using the wood for various projects. Use your combination square or a marking/panel gauge to mark the other (unplaned) long edge to the desired finished width. Make sure the board has one straight edge to go against the fence. Add a backerboard to prevent kickbacks. Shim the board under the high spots so it wont rock. Using a table saw, I cut two 60" lengths of 3/8" plywood that were just narrower than the opening of my planer (in my case, the width capacity is 12 1/2", so I made these pieces 12 1/4"). To minimize grain interruption at the joint, its important to avoid cutting through cathedral patterns. We may receive a commission when you use our affiliate links. I got an old sewing machine when I was just a kid, and I've been making stuff ever since.
 The cup is not as bad as my example. That would let you get thicker material through the planer. In order to flatten a warped, twisted, or cupped board, a common approach is to first use a jointer to create one perfectly flat face. it might be something to look into. Come back in a week and it will be cupped more than it is now. You explained it perfectly and the method is dirt simple, Thanks!! It's not guarenteed to work on wood (grains and mechanical bonding) but in the past I've found it works like seeming literal magic to delaminate hot glue joints. Use your marking gauge, basing off the reference face, to mark the thickness of your board around all 4 edges. are winding sticks important or will a straight edge work ok. Here are some supplies and tools we find essential in our everyday work around the shop. No thanks, I just want the lesson (click that X in the upper right corner), A Woodworking School Dedicated to Hand Tool Woodworking - The Hand Tool School 2022, you never need to plane across the grain or diagonally and you don't need a vise to hold the board, Semester 3: Workbenches and Joinery Review, How to stop applying a rote process and diagnose the uniqueness of each board, How spot planing removes much less wood and get you flat faster, Step by step instructions for making your own planing stop. This leveling platform is a good example of a tension torsion beam. That's three planes.Adam. I've been trying for TWO YEARS to figure a way out of buying a planer AND jointer! An electric hand planer is good for getting the wood somewhat flat. Part 5 of 6, complete. Just my opinion. I got it reasonably even after a few hours of material removal, but it did not have to be terribly precise since it was just a 'floating' slab desk. Some great ideas to take away and all well and good if you have a garage full of electric kit. Plane marks left by the jack's rounded blade are removed on the outside of the piece with a smooth plane. A simple box like this is guaranteed to stay perfectly flat and will not bow or warp, and creates a lightweight rigid sled to attach boards for planing. It won't get you all the way there though; it's lacks the precision needed to get perfectly flat. The hot glue can be removed with the help of a chisel. You see we are imperfect machines that are bound to interfere with the precision that our tools offer. Hand planing (rough) lumber to dimension is not hard: Ideally, you need 5 planes: a scrub plane, a #5, a #7 or #8, a #4 or #4-1/2, and a low angle block plane, but you can get away with a #5 and a low angle block plane -- it's just a little harder. Then hand-plane the remainder (Photo 5). My boards were all in pretty rough shape as you can see! Plane off the high corners, checking with the winding sticks and the straight edge to ensure you are maintaining a true surface.
A very good idea. Ah, I see. If your joinery doesn't allow for that, you've just learned a good lesson about selecting stock!Not to be undone by my own rhetoric: A little flattening, just to take off the high spots long enough to effect your joinery isn't out of the question. Copyright text 2022 by The Renaissance Woodworker. I never before knew how to do this. Ive had times where i couldnt get everything done that day and next day back to square 1 practically :(, Some people derive a lot of satisfaction working with traditional tools :), Tip This Instructable is my version of a pretty common board-flattening solution; if you do a bit of search-engine-ing, you'll find several great versions. Removing the jointer guard is no casual thing; you must take precautions! Very useful and helpful! Simple Woodworking Projects. sheet stock. In-depth articles, up-close photography, and detailed illustrations. You dont want to remove all the wood at once. As you did for the reference long edge, use the #5 to roughly smooth it down almost to the cutting line, and then use the #7/#8 to make it straight and square to the reference face. What is the minimun thickness that you can live with as a finished flat board for your project? Get instant access to over 100 digital plans available only to UNLIMITED members. Did you know you can get this lesson as well as over 600 hours of hand tool instruction by subscribing as an Apprentice to The Hand Tool School? The first board you do by hand will take what seems like an inordinately long time, but with just a little bit of practice, it becomes nearly as fast as -- and often faster than -- putting a board through a jointer, thickness planer, and sanding sequence. You do not state the length of the board. Also, go down to Home Depot (nice warm place to spend some time looking at boards on a week day morning (no one else around) where there's a nice big stack of #2 pine 1X4 - 1X12. I use sample laminate pieces which you can typically get for free from the kitchen section at home centers and hardware stores. I use a 16" jack plane, (you could use a cheap #6 which is the same length) and just work diagonally like you were thinking. Here's another way in case you get tired of hand planing: measure the amount of cup you have in the A side (from the bottom of the valley to the tops of the edges). SawdustSteve. You can use the #5 to plane to rough plane it flat and square to both the reference face and edge -- if the short edge is 4 to 6 or more inches wide; if not, then start with the LA block plane. 5. Weve all done this pick up a piece of plywood from the end and it bends like a wet noodle. Here are four tried-and-true techniques to tackle any size board with confidence.
American Woodworker July 2006, issue #122. Then flip the board and remove another 75 percent. Before you start think a bit. This step is typically done with a separate machine (a jointer), but for boards that are too wide for your jointer (or if you don't have one), the approach shown here can be used.
Assume that every stroke you take with the plane is throwing it out of flat and so you need to check with the straightedge often so you arent creating a shape that will require even more planing to fix. (Chamfering the edges down to your cutting line will reduce tear out on the corner edges; alternative methods are to clamp a sacrificial piece of wood to the edge and let it tear out instead of your board, or to plane in from each outside edge.)
I have a plan in mind, and this will require flattening a few slabs of wood, glueing them, and joining. To flatten a board, you need to remove the cupping and any bowing. This solution above solves the problem. Mark the other short edge to the desired length (saw it to rough length, if necessary) and do the same thing to the other short edge. Youll find its best to position a cupped board concave side up because its easier to shim around the perimeter than the middle of a board. All other measurements of square, etc, will come from this face. Since you are wanting 4 boards out of a 5' piece, I'd cut the board in half, to make things easier( 5' is at the upper limit of what is easy to plane by hand. Also, pay attention to the grain direction. Have you noticed any movement in the board with changes in humidity? Cut with the grain to avoid tear-out. You could look for places that sell lumber that's already square and planed (s4s). Skew the planer so the heel rides on the previously cut surface. 2. Once you get full length and full width shavings, you board is very, very close to FLAT. A torsion box that is 2" thick is roughly as rigid as a 2" thick board but much lighter. Press question mark to learn the rest of the keyboard shortcuts. If there's any chance the board would flex under the planer's cutter head, that would require full support of the board with shims in order to produce a flat top surface coming out of the planer. Good question. Unless you're dealing with some crazy cupping, when removing board-twist at least one corner of the board will likely be able to rest directly on the sled. Theyre hard to align when the board is reassembled. Enter now for your chance to win more than $2,000 worth of woodworking equipment from Woodpeckers. Caution: Secure a temporary acrylic guard over the cutterhead. Shifting the boards a bit may help blend the grain and hide the joint. /r/woodworking is your home on reddit for furniture, toys, tools, wood, glue, and anything else that has to do with woodworking as a hobby or profession. I assume that the gap to the box allows the oak to flex, but how does this help? Then follow up with the #5 by planing with the grain.) Realize, in your example, the shorter the board, the thicker it can be when flat. Check your progress frequently with a straightedge. Well, I don't have the Engineering answer either. Expect to get a good upper body work out! Hand planing is great for your fitness, your mental health, and the development of your hand skills, but if you just want speed and some nice flat boards, I'd do the whole job with your 13 inch planer!
a)b lets say the symbol to the right represents a cupped board. Same over the top (I have an under and over). No, not really. Select one long edge, and use the #5 to roughly flatten/smooth it, and then use the #7/#8 to make it straight and square to the reference face. Big, thick planks are best flattened in stages. After i plane across the grain to get the cupped side flat, what is the next step? After eye-balling 6 or eight boards, I found one that was nearly straight all ways. Now the board is ready for the planer. You may have to repeat the steps to get the whole length of the board flat. Part 2 of 6, complete. When every board is unique following a process to flatten a board by hand makes no sense. Then you run the board through a thickness planer with the flat face downward, and the planer makes the top face parallel to the bottom. Become an UNLIMITED member and get it all: searchable online archive of every issue, how-to videos, Complete Illustrated Guide to Woodworking digital series, print magazine, e-newsletter, and more. Learn.
 We may receive a commission from sales referred by our links; however, we have carefully selected these products for their usefulness and quality. I hear every day from woodworkers struggling to flatten boards by hand. Plane until the planer takes a complete cut over the whole surface, and then flip it doing the other side. I admire those of you who know to use your handtools to their best and greatest use. Now place the newly-flat boardface downward, and plane the remaining side. Use the reference edge and the try/combination square to mark one of the short edges square. That way, the joint will be less visible when the board is glued back together. sometimes you can join a local guild and have access to their equipment. Ill wet a cotton swab with 90% isopropyl and as soon as it makes contact it its like the hot glue just gives up :D. I recently aquired a tghickness planer and,was having dificulty in getting absolutly flat stock. TOTAL! The board is now fastened securely in place using hot glue. I figuring (hoping) that the lack of any signifigant warping in any direction will translate in to picture frames that will stay straigth. *The term "flatten" as I'm using it here means: make two board faces perfectly parallel to one another by removing warps, twists or cupping. You can flatten a board in seconds and get your faces flat and square to one another while removing VERY little wood. So it follows that the less planing we actually do the faster you can get a board flat. 4. You mentioned that you have a 13" planer, so maybe you are considering using it. Theres no need to cut an inch or two off a boards width so itll fit your jointer. the board i have is 5 feet in length and i am going to cut itinto roughly four 12 inch boards. You can pull the glue off of the taped surface, or just remove the tape and the glue should come with it. And I avoid the hassle of trying to match boards for a uniform, pleasing appearance.I used to shy away from these beautiful wide boards because I thought I needed an aircraft carrier-sized jointer to flatten them. what do recommend to bring with you when selecting stock, 12 inch straight edge? Otherwise, find a shop that has a jointer and planer and pay them to size the stock for you. Yet when you learn about how to hand plane a board flat you hear about a process of planing across the grain, then maybe diagonally, then finally with the grain. Shim under the high spots to prevent the planer rollers from flattening out the board before its cut. Correct with the scrub, as necessary. For the rest of us, a belt sander, a random-orbit sander (preferably a 6-in. Use the #5, and the #7 or #8, as before on the reference face to make this face flat and square. Im hesitant to even call this a technique or a method because it is the total absence of process that makes this milling approach so effective. If you have ever wondered or struggled with creating parallel edges or duplicate sized parts by hand then. It came off the edge of the log, and if the tree had grown with a curve in it, you'll see the curve reflected in the line between the sap and heart. How does this technique achieve parallel surfaces? Let the wood sit for a day or two on stickers. This is what the spot planing technique is all about. "One word of caution warped boards tend to have a ton of internal stress just waiting to be set free. Over the years, Ive learned a few tricks that allow me to take advantage of what a wide board has to offereven in a small shop. AW Extra 6/26/14 Flattening Wide Boards, https://www.popularwoodworking.com/wp-content/uploads/popwood_logos-01.png, https://www.popularwoodworking.com/wp-content/uploads/AWJUL06_5F00_122_5F00_18_5F00_leadimage2-113x113.jpg, 2020 Active Interest Media. So make her box-beam sled, without the top? Thats because removing wood releases tension, causing the board to slightly change its original shape. The concept is to support the piece well enough in a fixed position that we can send it through the planer and incrementally remove the high spots from the imperfect top face of the board, to create a top face that is one perfectly flat surface. To add on to this, you want to spend more time checking the board with a straightedge than you do actually planing. This is not the only sequence that it can be done in, but it works quite well. A cupped board should be set convex side up at first to prevent rocking.
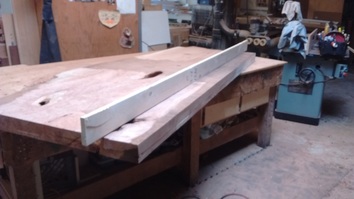
I have a tip: Try putting isopropyl alchohol on the hot glue when you want to debond it. Worse, the act of milling a board by hand gets labelled as slow and inefficient. With the 'good' side down, run the board through the planer to get both faces parallel and then run the second edge through the table saw to get the second edge parallel to the first (planed) edge. Make sure your not just working up a sweat to end up with a board that is unusable.
 Flip it over and repeat on the other side. Its just like cutting a giant rabbet: The uncut portion rides over the rabbeting ledge on your jointer.
 In my case this was especially important because the middle section of the board was not shimmed, so it was still possible that any extra pressure from the cutter head could have made the board bow downward, resulting in an unflat cupped board. Next, plane one edge square to the planed face. The board end closest to the camera was thinner, so it was propped high enough to avoid wasting time and losing tons of material to get the top side flat. 3. Start your 14-day FREE trial - and get building. 6.
The goal is to affix the imperfect board firmly to the support structure so it cannot move or flex at all. Instead, remove the jointers guard and make a full-width pass (Photo 4). Great! document.getElementById( "ak_js_1" ).setAttribute( "value", ( new Date() ).getTime() ); document.getElementById( "ak_js_2" ).setAttribute( "value", ( new Date() ).getTime() ); All fields with . All your work is with the grain making tear out a thing of the past and all your work is done against a simple planing stope which I show you how to make in this video., The planing stop and the spot planing technique is a total game changer. This is one way to flatten* large boards using primarily an electric thickness planer (without the help of a jointer). The only part I really don't know how to do in my plan is flattening the lumber I buy. I do have a sharp Lie Nielsen #4 plane and a 13 inch planer at my disposal. Please submit links to how-to pages and videos, pictures of beautiful and amazing pieces you made for us to admire, or help you finish. What are the steps to getting this board flat with a handplane? Please let me know how you people do it. This forum post is now archived. I have an extra long bed on my planer to help in reducing snipe and to make it a little more accurate for truing up the lumber. You only want to remove a tiny fraction at a time. When the two end sticks are parallel, run a third stick back and forth between the two to check for high areas in the middle. "I cut this piece four times and it's still too short. This allows you to run it thru the planer, A side down (and keeps the planer rollers fromcompressing the cup out of the board, which would result in a still cupped but thinner board). However, this does not impact our recommendations. After you joint one side, remove the board from the sled and plane the second side normally. It was 4" too wide for my thickness planer and the customer did not want me to cut that much off.
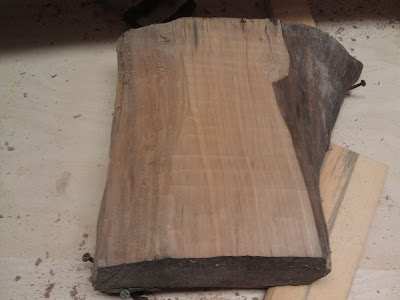
About: Make. Use the scraper on gnarly grain that gives your smoother a hard time, but be careful not to scrape a dip into the wood. Yes, winding sticks would be used to get the face as close to 'flat' as possible. What we need is a better way to flatten a board by hand! One word of caution warped boards tend to have a ton of internal stress just waiting to be set free. 3 years ago, Ooh! johnny d, i think you are right about picking better stock. Depending on the amount of cupping, I may start with a scrub plane with a SLIGHTLY radiused blade just to get rid of most of the main curvature and then go to my longer planes to finish the job. Check your work frequently. Panels and tabletops are so pleasing to look at when theyre made from a single board. This story originally appeared inAmerican Woodworker July 2006, issue #122. I just need to do it. Paint Creatively on Your Walls With the Best Masking Tapes for Painting, Transform Your Garage Into a Cozy Workshop With the Best Garage Heaters, Draw Precise Reference Lines Every Time With the Best Marking Gauges, Level up Your Woodworking Skills With the Best Power Saws, Drive and Pull Out Nails Conveniently With the Best Claw Hammers, Keep Your Strikes Precise With the Best Dead Blow Hammers, Work With Ease and Comfort With the Best Cordless Angle Grinder, Make Your Furniture More Durable With the Best Threaded Inserts, The Best Wire Crimping Tools for Electricians and Homeowners, Connect Your Wires Safely With the Best Butt Connectors, 40 Years in the Making: A Timeline of Popular Woodworking. However, for boards or slabs that are too wide for a jointer (but still narrow enough to fit through a thickness planer), the approach demonstrated in this Instructable is one way to perform both steps needed to flatten boards using just a thickness planer, rather than using a jointer AND a planer. The gauge is just a 2-in.-thick block with a 5/8-in. Being new with this tool, I hadnt realized that the the stock was very slightly thicker in the middle of the lenght of the boards, making either side "rock" to the left or right and never really getting them really flat width-wise. To finish the box, I sprayed it with a few coats of spray lacquer, followed by a light sanding with 220 grit sandpaper. That will give you a feel. Eyeball a whole bunch of boardsyou'll pick up on which ones are straight and which ones are crooked right away. 8. Once i got started i realized that the process is not necessarily physically hard. A handheld power planer is the key to this technique. And the narrower you make it the more it flexes. I have some basic tools (hand saw, jigsaw, chisels, etc) but don't have room for (or money) for a table saw, or thickness planer or jointer. I seem to be having a simple misunderstanding of the concept. 2 years ago Is rounding the edge of the plane blades recommended? Clamp an acrylic guard to the fence to keep your hands clear of the cutterhead. First use a lumber crayon to mark the high areas. What is the minimun length you can live with as a finished flat board. Mark this face as your reference face. Your description seems to indicate it's pretty moderate, so say for example it is 1/4"; rip a narrow spacer 1/4" thick out of scrap wood, the length of the board, and hot glue it in place along the bottom of the valley. Or rip it now and then edge glue the pieces back together and run the whole glue-up through the planer. Dont limit your woodworking to boards that fit on your jointer or planer. I then waxed the two larger faces with furniture wax (so either side could be used face down, but this is also helpful to remove masking tape that's used as well - which is shown later). Their frustration mounts and their planes end up sitting on a shelf. Follow the straight grain and your joint will be almost invisible. Leave the board a little thick so it can be planed to finish thickness after the glue dries. Better for you to do it by hand, but not essential. I used glue and pneumatic brads to fasten all these pieces together as shown. Not designed for accurate depth control, but rather for hogging out wood roughly. A long plane is needed to straighten the edges. Finish up with the smoothing plane (#4 or # 4-1/2). Try this technique instead: Joint an edge of the board and then rip it on the bandsaw (Photo 6). Absent are jarring grain patterns and color changes caused by multiple board glue-ups. The pieces of oak shown here were beefy enough that I was comfortable not shimming along the middle section of the board. Then re-mark and finish flattening the board. In agreemant with Midnight, you might consider planing off a slight amount at a time, and waiting to see if internal stress does something unexpected before you continue. Fasten a stop at the front of the sled to keep the rollers from pulling the board through without the sled. Share it with us! A power hand planer will also do the job.
7. The reason is that almost all of a board's rigidity derives from the surfaces and is increased by the distances between them. Press J to jump to the feed. The board to be flattened is placed on the box and made as level as possible using shims to fully support it. Remove about 75 percent of the wood you need to take off the first side. It seems like if you left part of it touching the support and shimmed the high spots, it would be less likely to flex during planing. Lift each board off the pile, one end down, one end up next to your face, and site down the edges. Check for straight and square to the reference face and to the 2 short edges. If it does prove effective on wood you can go more ham on hot glue knowing you can easily remove it with isopropyl alchohol :). I would find it difficult for a wide board, something wider than the planer blade, usually I'd take it down with the electric planer and finish off with a hand planer where I could filter in the hand planer marks. I used mine recently on a slab. Take them home and work them into a project. Our biweekly podcast allows editors, authors, and special guests to answer your woodworking questions and connect with the online woodworking community. For a thinner board where it is likely to flex in the middle under the pressure from the planer's cutter head, you will want to shim and secure the entire length. Did you make this project? If the board is more than 2 in. Reply 2022 The Taunton Press, Inc. All rights reserved. Reply what is your process? Don't be at all surprized to find that the board moves some more as you work it. Repeat! I just selected a piece of cherry from a pile of kiln dried 15/16" 7' long random width stockit was amazing how much variation in both cupping and warping existed. If that piece of wood was in my shop, I'd start with the 'B' side. This created a lightweight, but perfectly flat box. My name is Sam and I'm a community manager here at Instructables. Do you start by flattening the b side first? Now imagine that it is lying on your workbench with the a side facing the floor and the b side facing up. I know its not what the 'experts' recommend, but I frequently feed cupped boards straight into my thicknesser, taking light cuts and swapping sides after each pass, and I can produce perfectly flat boards after just half a dozen passes in favourable conditions. Mark this edge as your reference edge. Don't try to plane one face all the way to perfection before working on the other, but rather, try to equalise the stock you're removing from each face at roughly the same time to keep the stresses in balance. Big, wide boards make my heart race with anticipation. Subscribe . run it through the planer to get it smooth and to final thickness or just simply use the handplane and plane with the grain? We are delighted to share some of the best AW content here on the PW website. If it is relatively short, you can use a decent streight edge to check for levil down the length of the board. Wood is non-isotropic (mechanical porperties differ in different directions) unlike metal and it will not hold the aerospace tolerances woodworkers desire from their expensive milling machines. Moreover, you never need to plane across the grain or diagonally and you don't need a vise to hold the board. Plane the high spots down to the line using a handheld power planer. With some species that have pronounced differences between the outside sap wood and inside heartwood, a giveaway is a piece that has BOTH sap and heart. your orientation is fine i.e cup-side up, hollow facing down, scrub across the grain until the cupped side is reasonably flat, check it regularly with both winding sticks and straight edges as you go (it could be twisted too).
If not how do i avoid this or minimize this. This was all done on top of a few strips of painters masking tape. After getting rid of the bowing and cupping, the board in all likelihood won't be flat, so you'll have to use winding sticks. Every board is unique. The net result of all of this is a flat board with very little time spend planing and VERY little actual wood removed. My boards were all brought to the same thickness and then were ready to be used for other projects. Start your 14-day FREE trial - and get building! All rights reserved, Join us for a Freud Tools Event at Whitewater Shaker Village, Free Woodworking Downloads From Lee Valley, I Can Do That! Because I'm being lazy (and don't want to forget anything), this is copied from another thread (my text). Ill just adapt the way the stock will be fixed to pass through the planer as theyre smaller pieces, but the idea is just that! UNLIMITED Membership is like taking a master class in woodworking for less than $10 a month.